
Manual
Doutor VPD manual
How to use your air VPD monitor: from first use to firmware updates.
In this manual
- 1. What's in the box
- 2. Getting started
- 3. The buttons
- 4. The 7 screens
- 5. Changing the plant stage
- 6. What the numbers mean
- 7. Where to place the sensor
- 8. Battery and brightness
- 9. Updating over your phone
- 10. Installing or reinstalling from a computer
- 11. Messages and problems
- 12. Switching on, off and restarting
- 13. Care and specifications
- 14. Help
Doutor VPD is a pocket air VPD monitor for growing cannabis: an M5Stack StickS3 with the ENV III sensor. It measures temperature and humidity, works out the air VPD, compares it with the target of your plant's stage and tells you what to adjust. It works on its own: no account, no cloud, no app and no Wi-Fi needed to measure.
This manual covers firmware 0.2.2 and later. The installed version is shown in SETTINGS › UPDATE.
1. What's in the box
- StickS3: the device with the screen, the internal battery (250 mAh) and the buttons.
- ENV III sensor: the small white unit that measures temperature, humidity and pressure.
- Grove cable: connects the sensor to the StickS3. In the assembled kit it comes already connected.
The USB-C cable and charger are not in the box: use a USB-C cable and a phone charger or a computer's USB port.
2. Getting started
-
Connect the sensor: the Grove cable goes into the white 4-pin port at the bottom end of the StickS3, on the back, next to the USB-C (Port A). In the kit it is already connected.
-
Plug in USB-C: the boot screen shows the name,
StickS3 okandENV III ok. In English the device calls itself VPD Gennie; in Portuguese, Doutor VPD. If it showsENV III --, the sensor was not found: check the cable. The device carries on and starts measuring by itself as soon as the sensor answers. -
Splash: a spinning leaf with
VPD GENNIE, for about 5 seconds. Measuring has already started underneath; any button skips it. -
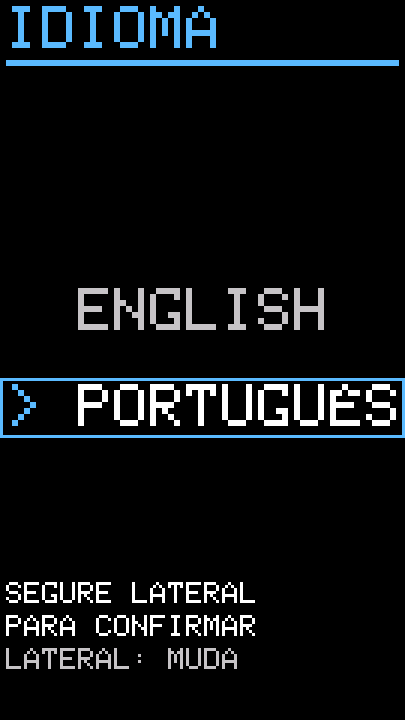
Language: on first use the device asks for the language, right after the splash. Press SIDE to switch between ENGLISH and PORTUGUÊS (the screen already changes language) and hold SIDE to confirm:
SAVING...and then the dashboard. It does not ask again. To change it later, use SETTINGS › LANGUAGE. (Version 0.2.2 started in English without asking: change it in SETTINGS › LANGUAGE, as explained under Settings.)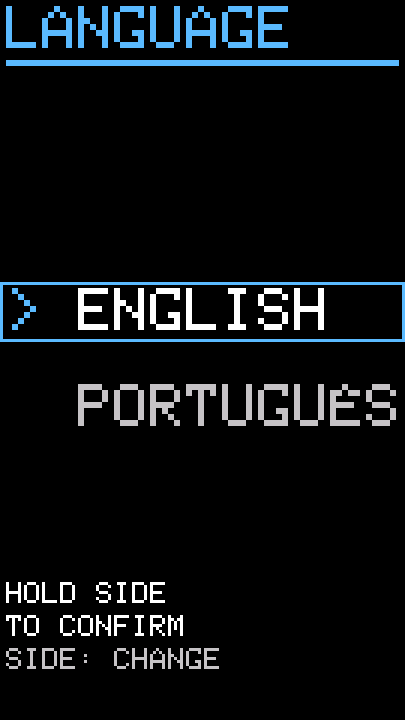
-
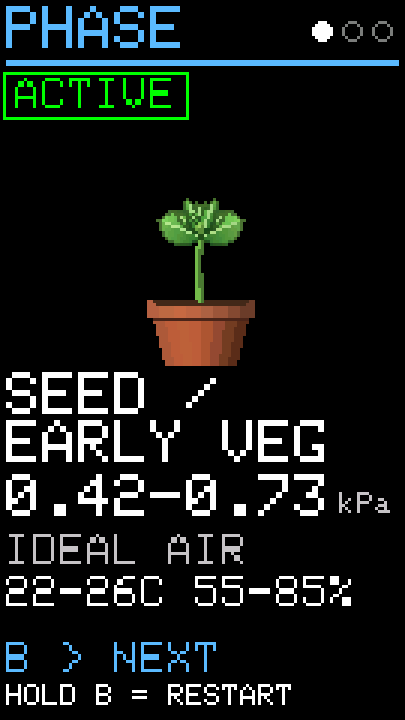
Choose your plant's stage on the PHASE screen (see Changing the plant stage). A new device starts in SEED / EARLY VEG.

3. The buttons
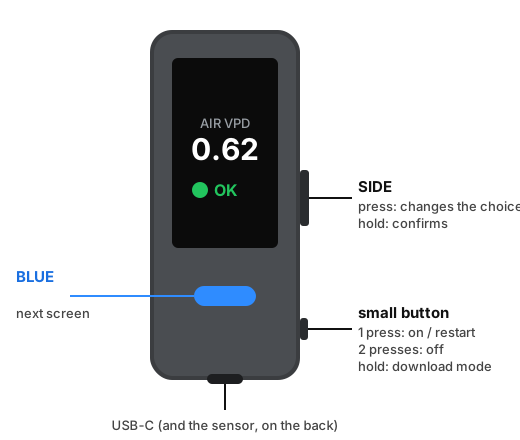
| Button | Where | What it does |
|---|---|---|
| BLUE | the big blue button on the front, below the screen | goes to the next screen |
| SIDE | the bigger button on the side | press: changes the choice on the screen; hold ~1.2 s: confirms (save, edit, update) |
| Small button | the smaller button on the side, near the USB-C | switches the device on, off and restarts it (not used on the screens) |
- Press is a quick tap. Hold means keeping it pressed for about 1.2 seconds; a hold acts only once.
- The bottom rows of each screen say what each button does there: BLUE, SIDE and HOLD SIDE.
- On battery, after a while the screen dims and turns off. The first press only wakes the screen; the next one acts.
- No press of BLUE or SIDE switches the device off, restarts it or erases it.
4. The 7 screens
The BLUE button goes through the screens in this order and then back to the start: Dashboard → Advice → Stage chart → Big picture → Graph → Phase → Settings.
Dashboard
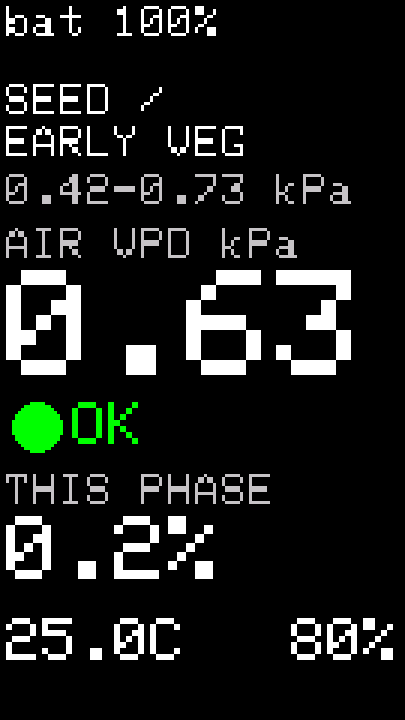
The main screen. From top to bottom:
- the battery (
bat 80% chgcharging,bat 80%on USB,bat 80% --on battery); - the stage and its target (for example
0.42-0.73 kPa); - the AIR VPD in kPa, in big numbers;
- a ball and a word with the situation right now;
- THIS PHASE: how much of this stage's time the air was on target;
- the temperature (C) and humidity (%).
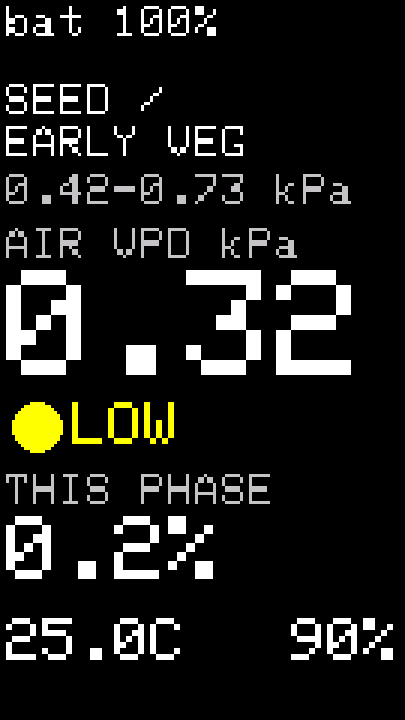
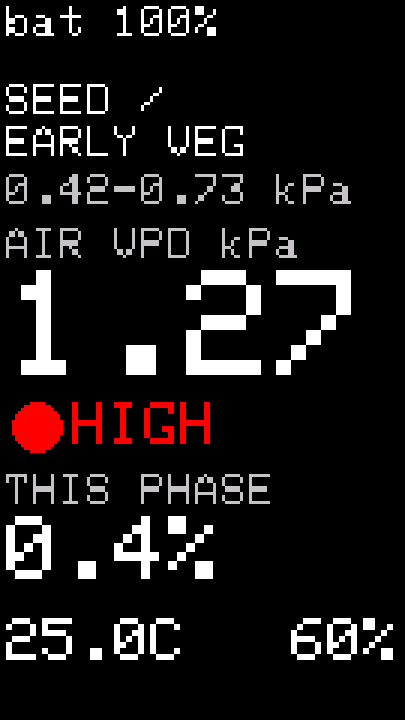
| Ball | Word | Meaning |
|---|---|---|
| green | OK |
the air VPD is inside the stage target |
| yellow | LOW |
below the target: the air is too humid for the stage (or too cool) |
| red | HIGH |
above the target: the air is too dry (or too warm) |
| grey ring | NO DATA |
there is no valid reading right now |
| grey ring | CONFIG ERROR |
see Messages and problems |
On USB the number is the median of the last 3 readings (one every 5 seconds), so it does not flicker at a limit. Percentages and history always use the real readings.
Advice
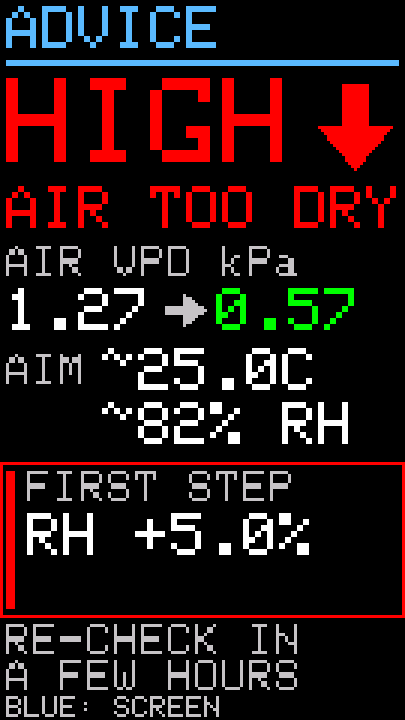
Tells you which way the VPD has to go and the first step:
- the situation (
OK,LOW,HIGH) with an arrow; - the reason:
KEEP IT,AIR TOO DRYorAIR TOO HUMID; - the VPD now → the target (the middle of the stage's range);
- the AIM temperature and humidity to get there;
- the FIRST STEP, for example
RH +5.0%(raise humidity 5 points) orNO CHANGE.
How to use it:
- Humidity first, in small steps. The step changes humidity by at most 5 points; temperature (at most 2 °C) only comes in when humidity alone cannot reach the target.
- Make one change and check again after a few hours (
RE-CHECK IN A FEW HOURS): the room, the plants and the sensor need time. Don't chase every reading. - The aim temperature and humidity always stay inside the stage's safe range:
| Stage | Safe temperature | Safe humidity |
|---|---|---|
| SEED / EARLY VEG | 22–26 °C | 55–85 % |
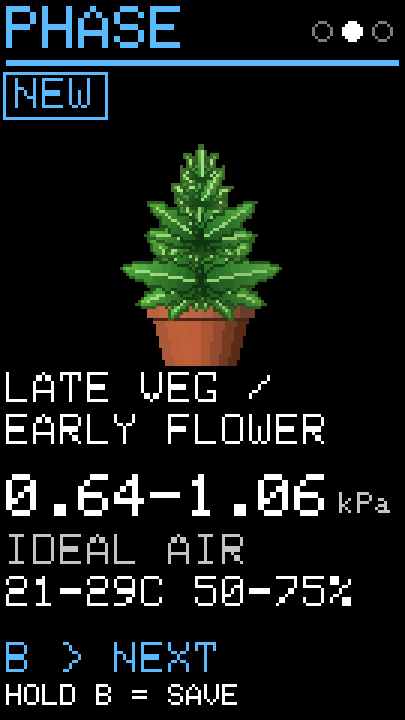
| LATE VEG / EARLY FLOWER | 21–29 °C | 50–75 % |
| MID / LATE FLOWER | 21–27 °C | 40–60 % |
Stage chart and Big picture
Two temperature × humidity tables: warmer rows further down, more humid columns to the right.
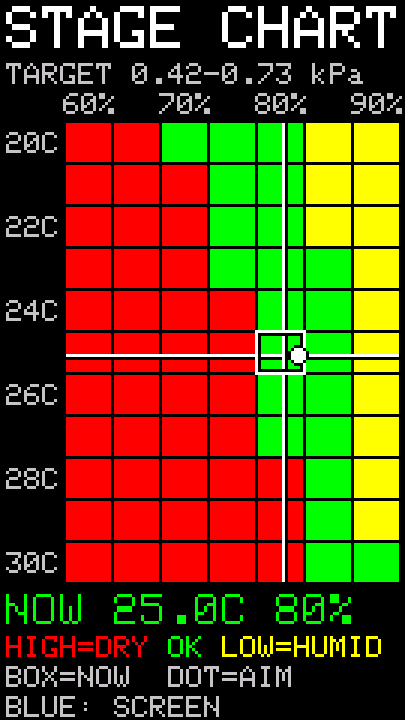
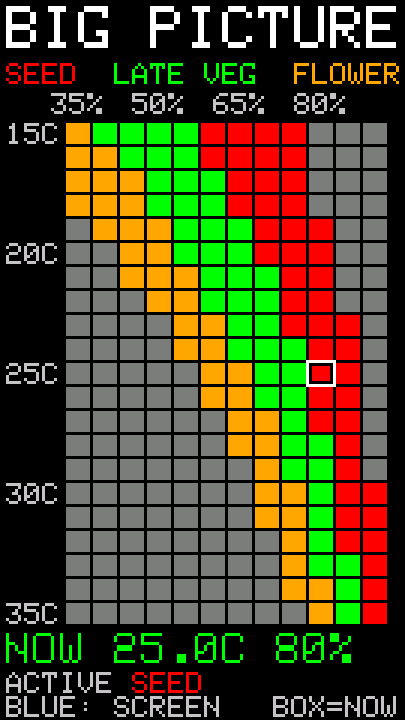
- STAGE CHART: a window around your reading, coloured for the active stage: green
OK, yellowLOW=HUMID(low VPD), redHIGH=DRY(high VPD). The box marks where you are now; the dot marks the advice aim. - BIG PICTURE: the whole table, 15 to 35 °C and 35 to 90 % humidity, coloured by the stage of each range (SEED, LATE VEG, FLOWER). A small box marks your reading.
Graph
The VPD over time, with the stage's target band behind it. SIDE changes the window: 1 H → 6 H → 24 H → 7 D → PHASE.
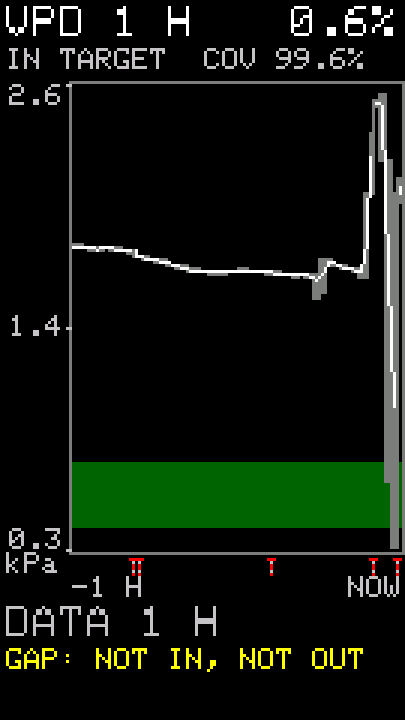
- IN TARGET is the share of time on target; COV (coverage) is how much of the window was actually measured.
- Time is powered time: the device has no clock. A period switched off does not show; it becomes a
Tmark and the line breaks there. - Marks under the graph:
|stage change,Trestart or switched off,:missing data.
Phase
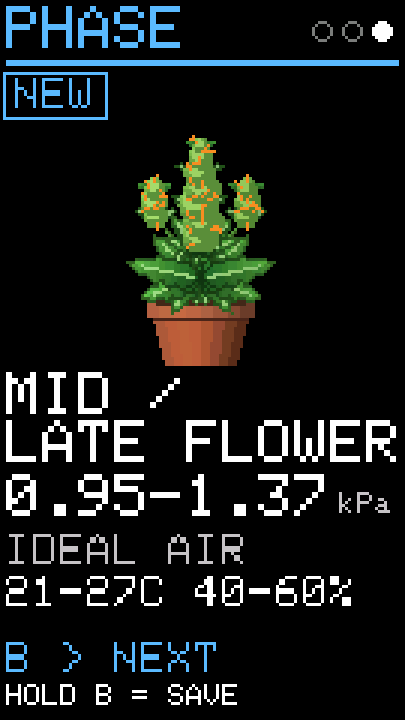
One stage at a time, with the plant picture, the VPD target and the IDEAL AIR (temperature and humidity). See Changing the plant stage.
Settings
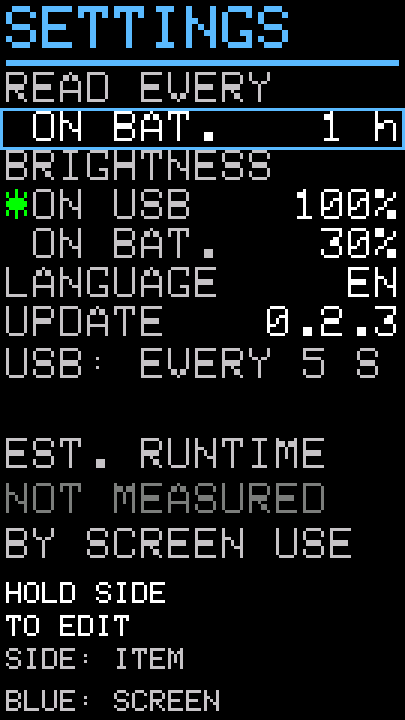
Five rows, each with its saved value:
| Row | Values | Default |
|---|---|---|
| READ EVERY ON BAT. | how often the sensor is read on battery: 1 min, 5 min, 15 min, 30 min, 1 h, 2 h | 1 h |
| BRIGHTNESS ON USB | 10, 30, 50, 75 or 100 % | 100 % |
| BRIGHTNESS ON BAT. | 10, 30, 50, 75 or 100 % | 30 % |
| LANGUAGE | EN (English) or PT (Portuguese) | asked on first use |
| UPDATE | the installed version; hold SIDE to update | — |
To change a value:
- SIDE goes to the next row.
- Hold SIDE on the row: it enters editing (
TO EDIT). - SIDE changes the value. You see the result right away: brightness changes at once, and so does the language.
- Hold SIDE again to save:
SAVING...and thenSAVED. - To give up, press BLUE: nothing is saved.
SAVED means it is stored and in force from now on. SAVE FAILED means nothing changed.
5. Changing the plant stage
The device compares the VPD with the target of the chosen stage. Change the stage when the plant changes.
- Press BLUE until the PHASE screen.
- Press SIDE to go through the stages (
B > NEXT). The stage in use has the greenACTIVEbadge; another stage shows the blueNEWbadge. - On the stage you want, hold SIDE (
HOLD B = SAVE):SAVING...and thenSAVED.
The dashboard and the percentages change only after SAVED. If it shows SAVE FAILED and OLD PHASE KEPT, nothing changed. Pressing BLUE before holding cancels the choice.
Starting a new grow in the same stage
There is no "clear history". To start over (and reset the stage percentage) without changing stage: on the PHASE screen, stay on the ACTIVE card and hold SIDE (HOLD B = RESTART). A new count starts; the old history stays stored and ages out by itself over time.
6. What the numbers mean
Air VPD
VPD (vapour pressure deficit) says how hard the air "pulls" water from the leaves. The device shows the air VPD, worked out from the air temperature and humidity the ENV III measures. It does not measure leaf temperature. Under the lights a leaf is usually a little cooler than the air, so the leaf VPD is a little below the air VPD shown.
The target of each stage
| Stage | Air VPD target |
|---|---|
| SEED / EARLY VEG | 0.42–0.73 kPa |
| LATE VEG / EARLY FLOWER | 0.64–1.06 kPa |
| MID / LATE FLOWER | 0.95–1.37 kPa |
You choose the stage, not the numbers. The limits count as inside the target.
Now versus this phase
- The ball and the word are about now.
- THIS PHASE is the share of the time measured since the stage started in which the air was on target. It carries on after a restart.
--means there is no measured time yet.
Time without readings doesn't count against you
Time without a valid reading (sensor unplugged, device switched off) is unknown, not "off target": it is left out of the count. Coverage (COV on the graph) shows how much was actually measured.
7. Where to place the sensor
- The ENV III sensor at canopy height, in the air the plants get, away from the lamp's direct light.
- Away from the humidifier's mist and from air blowing straight from a heater or air conditioner.
- Away from the StickS3 body: use the cable's length to keep the two apart.
- No leaves touching it and no water on either part.
8. Battery and brightness
- On USB the device stays on with the screen lit and reads the sensor every 5 seconds. That is the right way to use it day to day.
- On battery it reads at the READ EVERY ON BAT. interval (default: 1 h). The screen dims after 15 seconds without a press and turns off at 30; the first press only wakes it. Intervals shorter than 1 h show
USB ADVISED. - How long it lasts: we measured 100 hours from a full battery until the device switched itself off, reading every 1 h, battery brightness at 30 % and the screen off most of the time. Shorter intervals and more looks at the screen use more; those cases were not measured.
- The device does not show a runtime estimate (it shows
NOT MEASURED). LOW BATTERY(red) shows at 15 % or less, on battery.- The battery percentage comes from the voltage, it is not an exact gauge: the last 20–30 % go faster.
- Charging on USB: plugged in and running on USB, the device keeps the battery at about 70 to 80 %. To fill it to 100 %: switch the device off (two presses of the small button) and leave it on the charger for a few hours.
- Plugging the charger into a device that is off may switch it on: check the screen.
- Brightness: there is one value for USB and another for battery (BRIGHTNESS ON USB and BRIGHTNESS ON BAT. in Settings). More brightness on battery lasts less.
9. Updating over your phone
The firmware and its updates are free. The device downloads the new version by itself over your phone's internet (hotspot), Android or iPhone. The device's Wi-Fi is on only inside this screen.
Before you start:
- The device on the USB cable (charger or computer) and with at least 30 % battery to install.
- The phone with mobile data.
- The hotspot password is your device's 10-digit code, shown on the screen. Each device has its own, and it is always the same.
- The device uses the 2.4 GHz band only.
Step by step
- In SETTINGS, press SIDE until UPDATE and hold SIDE. Without the USB cable it shows
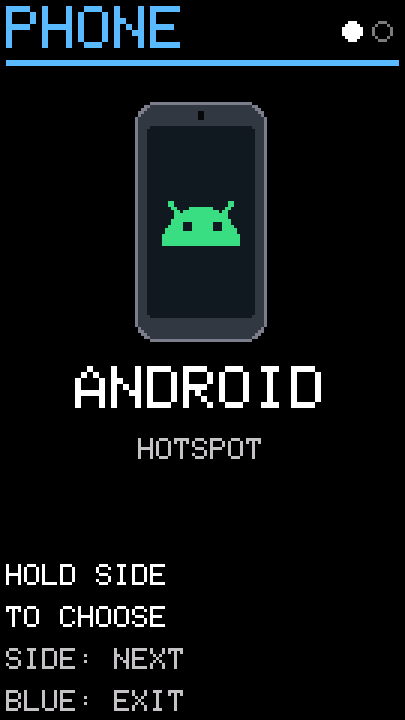
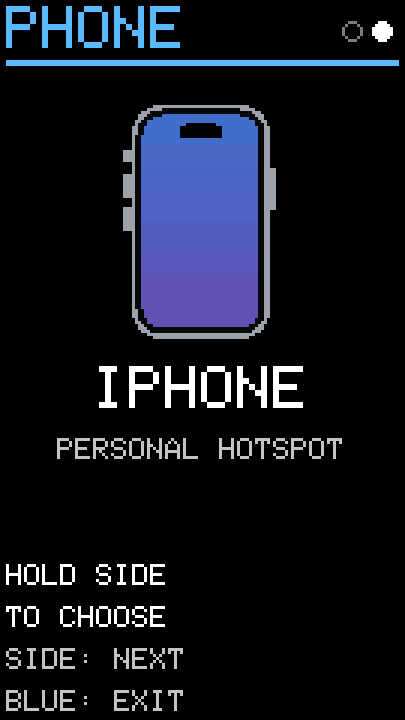
PLUG IN THE USB CABLE: plug the cable in and it carries on by itself. - Choose the phone: SIDE switches between ANDROID and IPHONE; hold SIDE to choose.
Android
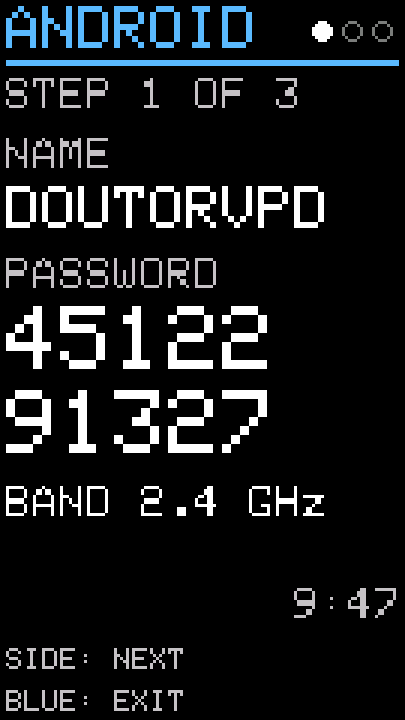
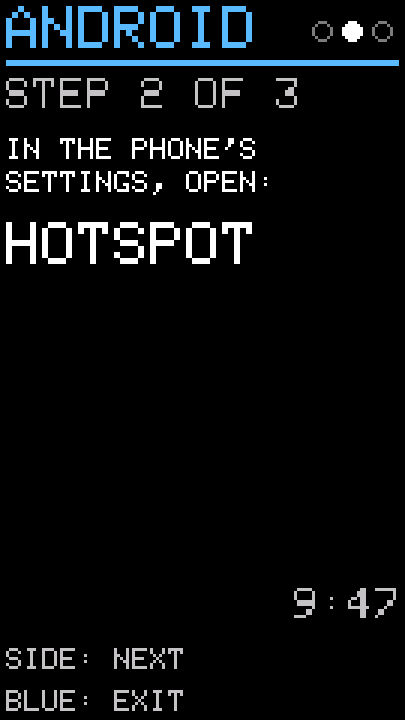
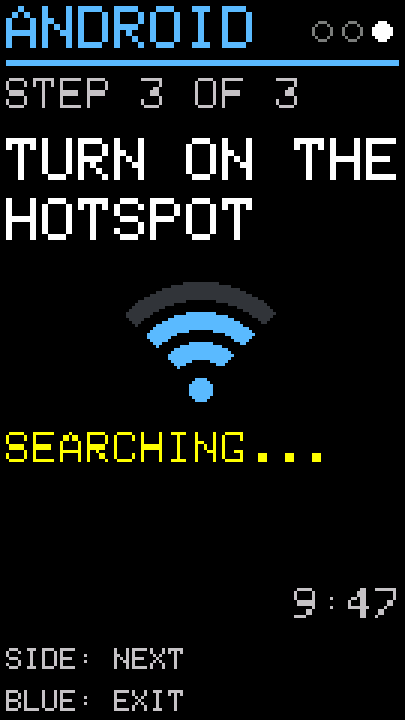
- Step 1: on the phone, set up the hotspot with the name DOUTORVPD, the password shown on the screen and the 2.4 GHz band.
- Step 2: in the phone's settings, open Hotspot (the path changes from phone to phone).
- Step 3: turn the hotspot on. The device looks for it and connects by itself, at any step.
SIDE goes to the next step. The picture shows an example code: use the one on your screen.
iPhone
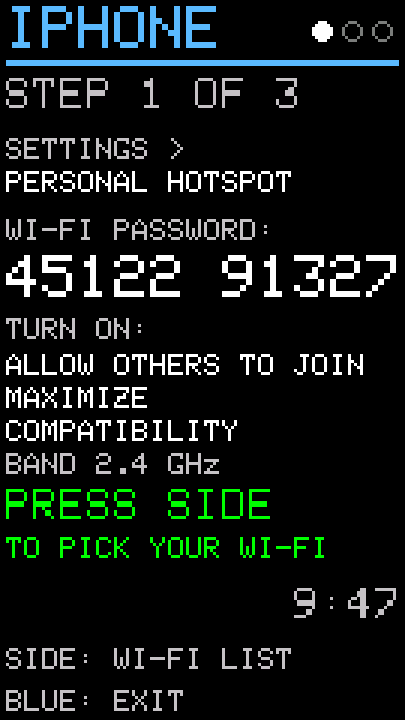
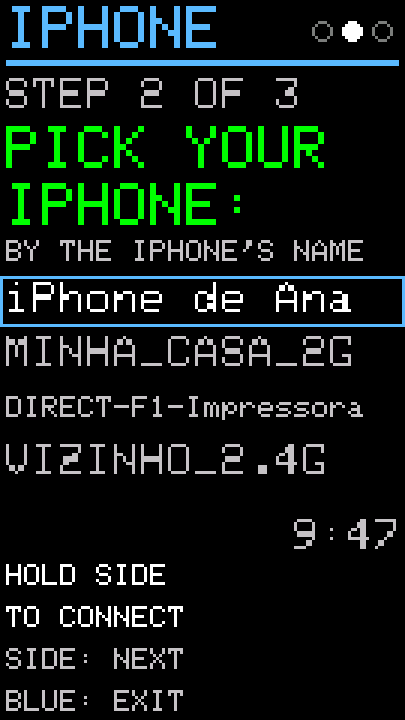
- Step 1: on the iPhone, in Settings › Personal Hotspot, use the code on the screen as the Wi-Fi password and turn on Allow Others to Join and Maximize Compatibility. Keep that iPhone screen open. On the device, press SIDE to see the network list.
- Step 2: pick your iPhone by its name (Settings › General › About › Name). SIDE goes to the next name; hold SIDE to connect.
- Step 3: the device connects.
SIDE: OTHER NETWORKgoes back to the list.
Installing
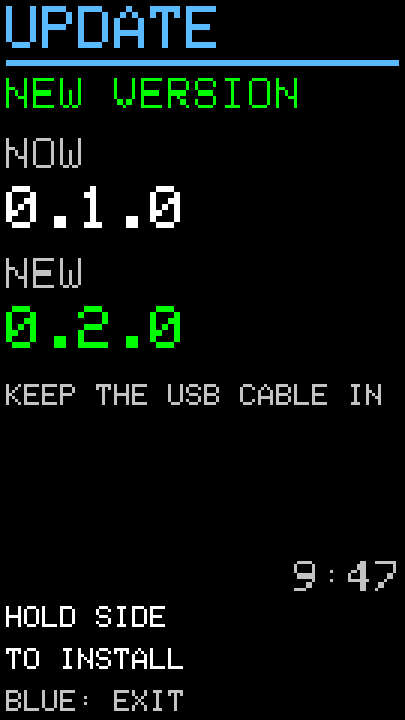
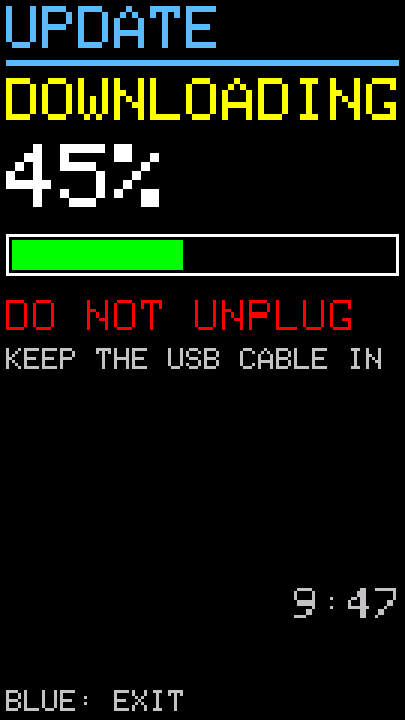
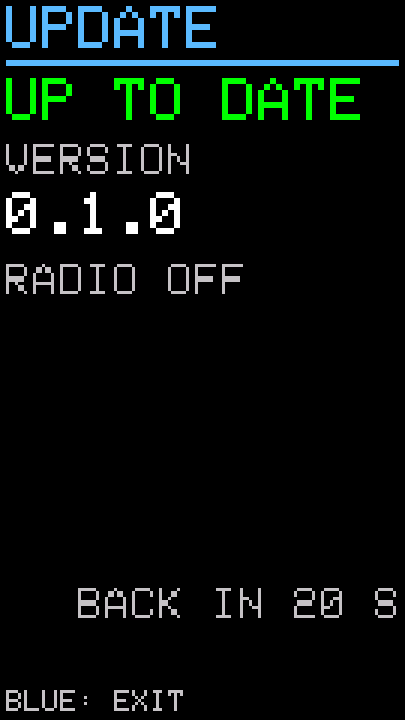
CONNECTED, thenCHECKING FOR AN UPDATE. If the phone has just turned its hotspot on,WAITING FOR INTERNET...may show for up to a minute.- If it already has the newest version:
UP TO DATE. Done, nothing to do. - If there is a new version:
NEW VERSION, with the current and the new one. Hold SIDE to install. DOWNLOADING,VERIFYING,INSTALLING,RESTARTING: do not unplug the cable. The device restarts by itself on the new version.
History, stage and settings carry over after the update. The device only installs a version signed by us, and only after checking the whole file. The new version stays only after it starts and runs for 30 seconds; if it does not start properly, the device goes back to the previous one by itself.
BLUE: EXIT leaves the update at any time (during the download, nothing is installed).
If something goes wrong
| Message | What to do |
|---|---|
HOTSPOT NOT FOUND / CHECK NAME, PASSWORD AND 2.4 GHz |
check the name (Android: DOUTORVPD), the password and the 2.4 GHz band; the hotspot may have switched itself off |
PASSWORD DOES NOT MATCH |
type the code shown on the screen into the phone again |
NO INTERNET / THE PHONE NEEDS MOBILE DATA |
turn on the phone's mobile data |
USB CABLE REMOVED |
plug the cable in and try again |
NOT ENOUGH MEMORY |
restart the device (one press of the small button) and try again |
DOWNLOAD FAILED, TIMED OUT |
try again |
INVALID SIGNATURE, INVALID RELEASE DATA, FILE CORRUPTED |
nothing was installed; try again later |
After a failure, hold SIDE to try again. The end screens go back to SETTINGS by themselves after 20 seconds.
10. Installing or reinstalling from a computer
To install the firmware on a StickS3 that came with other firmware, or to reinstall it, use doutorvpd.com.br/firmware on a computer with Chrome or Edge and a USB-C data cable.
- A StickS3 straight from the box: before connecting, hold the small side button (not the big one) until the green light inside flashes. That is download mode. Then choose Instalação limpa (clean install).
- Instalar ou atualizar (install or update, the default) erases nothing: history, stage, settings and the hotspot code stay.
- Instalação limpa (clean install) erases everything before writing: use it only on a StickS3 coming from other firmware.
- If the screen stays dark after writing, press the small side button once.
11. Messages and problems
Warning lines on the dashboard
| Warning | Meaning | What to do |
|---|---|---|
SHT30 NOT FOUND, SHT30 BUS ERROR, SHT30 CRC ERROR, SHT30 BAD VALUE, SHT30 NO UPDATE, SHT30 NO DATA |
the temperature and humidity sensor is not answering properly | check the Grove cable at both ends; the device recovers by itself when the sensor answers |
PRESSURE LOST (VPD OK) |
the pressure sensor did not answer | nothing to do: pressure is not part of the VPD |
STORAGE DEGRADED (yellow) |
one write failed | nothing to do: the next minute saves normally |
STORAGE READ-ONLY or STORAGE FAILED (red) |
the device cannot save | keep it on; if it stays, restart it with one press of the small button |
PHASE: RE-INITIALIZE |
the saved configuration could not be read | see below |
The device keeps measuring and showing the VPD in all of these cases.
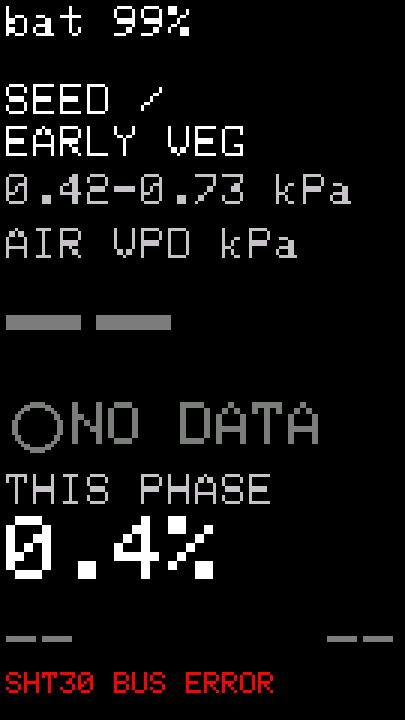
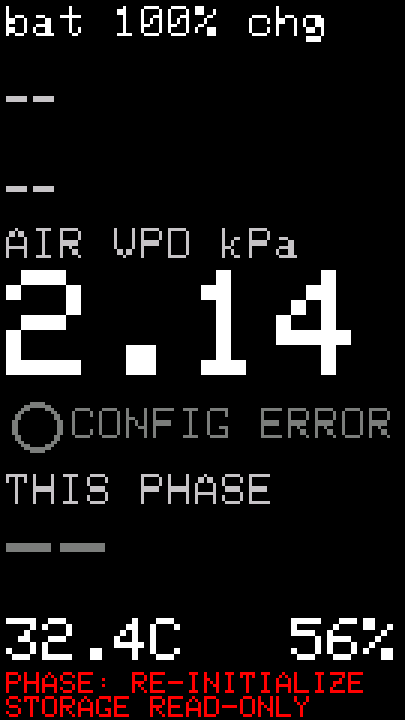
CONFIG ERROR and RE-INITIALIZE
If the dashboard shows CONFIG ERROR and PHASE: RE-INITIALIZE, first restart the device (one press of the small button): most of the time that solves it.
If it stays, the way out is RE-INITIALIZE, which ERASES ALL HISTORY:
- Go to the PHASE screen: it shows
CONFIG ERRORandRE-INITIALIZE. - Hold SIDE ~1.2 s:
ERASES ALL HISTORYshows. - Within 10 seconds, hold SIDE again:
ERASING...(do not power off) and thenRE-INITIALIZED.
Any other button, leaving the screen or waiting 10 seconds cancels it, and nothing is erased. After re-initializing, the device is like new: stage SEED / EARLY VEG, empty history and the language question again.
Other
- Dark screen: on battery the screen turns off by itself; one press of any button wakes it. If it does not, press the small side button once.
- Power cut: the device loses at most the minute in progress. Everything that showed
SAVEDstays saved.
12. Switching on, off and restarting
All with the small side button:
| Press | What it does |
|---|---|
| one press | switches on, or restarts if already on |
| two presses | switches off |
| hold | download mode (green light flashing), only to install the firmware from a computer |
The green light inside is off in normal use; it does not show charging.
13. Care and specifications
- Operating temperature: 0 to 40 °C.
- Water: keep the StickS3 and the sensor away from water, splashes and the humidifier's mist.
- Wi-Fi: 2.4 GHz only, and only during an update.
- Battery: 250 mAh, internal.
- History: the device keeps at least 7 days of powered minutes; the oldest ages out by itself.
14. Help
Questions, problems or suggestions: contato@doutorvpd.com.br.
The Android robot is reproduced or modified from work created and shared by Google and used according to terms described in the Creative Commons 3.0 Attribution License.